GUIDE • AWS • NEAX.AI
How to create an AWS account and get ready to connect it to Neax.ai
AWS Account Setup and Neax.ai Configuration Guide
This guide is for people creating an AWS account for the first time. No in-depth technical knowledge is required. It walks you from sign-up all the way to the AWS Console, and points out which parts of the Neax.ai configuration and connection still need to be confirmed before you go ahead.
SCOPE This guide covers the full AWS sign-up process based on the screens provided, from the registration page to the AWS Console. The AWS configuration steps specific to Neax.ai, and the fields to fill in on Neax.ai, are not yet covered by the source material. Those parts are marked [TO BE CONFIRMED] so that nobody follows incorrect instructions. |
Safety rules
Never share your AWS password, email verification code or card security code.
Never send card details or AWS sign-in details by email, chat or any form you cannot verify.
Only create access keys or grant AWS permissions when Neax.ai gives you official instructions to do so.
Overview: what is AWS and why does Neax.ai need it?
What is AWS — Amazon Web Services (AWS) is a cloud computing platform. An AWS account gives you access to the AWS Console, where you manage your own services and resources.
Why Neax.ai needs AWS — Neax.ai needs to connect to certain AWS resources or permissions to run the related features. The exact services, access rights and connection method are not in the source material yet and must be confirmed by Neax.ai before you configure anything.
By the end of this guide
You have a working AWS account and can sign in to the AWS Console.
You know which details you still need from Neax.ai before configuring AWS.
You can check your account setup yourself and recognise when the Neax.ai connection cannot be confirmed yet.
Before you start: what to prepare
Have the following ready before you begin:
What you need | Details |
|---|---|
An email address you use | Receives verification codes and lets you recover your AWS account if needed. |
A new password | A password used only for AWS. Do not reuse your email or Neax.ai password. |
Contact details | Full name, organization name if any, phone number and address. |
A valid payment card | Card number, expiry date, security code, name on card, and the ability to verify it with your bank. |
Authority to accept | You must be authorised to accept the AWS Customer Agreement on behalf of yourself or your organization. |
IMPORTANT The source screens show that AWS may place a temporary hold of USD 1 (or the equivalent) for 3 to 5 days to verify the account and prevent fraud. |
ABOUT OFFERS The Free plan, its duration and the amount of credits may change. Always read what AWS shows on screen before choosing a plan. |
Creating your AWS account step by step
This part takes place on the AWS website. Complete steps 3.1 to 3.9 in order. Do not move on to Neax.ai until you can see the Console Home page.
3.1 Open the AWS sign-up page
Purpose — Start creating a new AWS account.
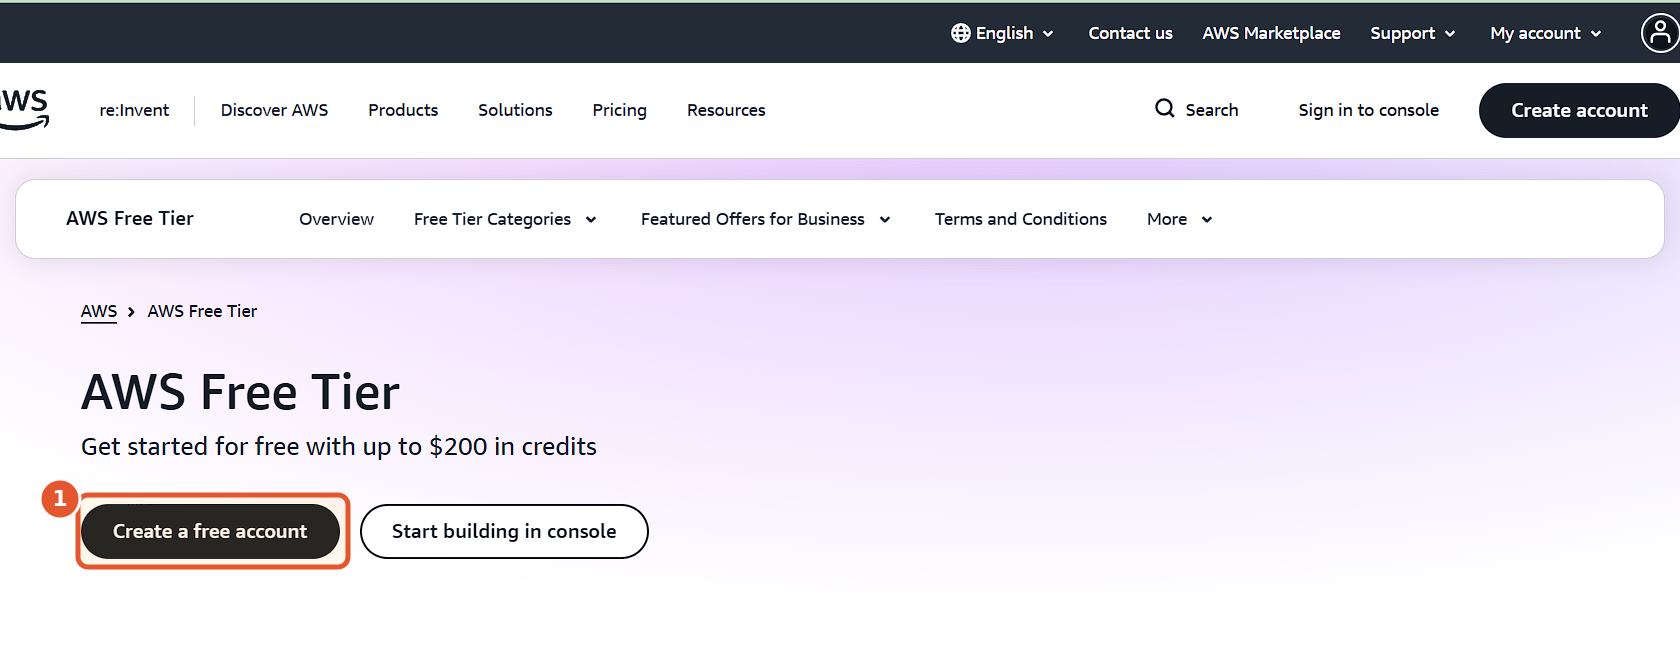
What to do — Open the AWS Free Tier page as shown in the screenshot.
Click Create a free account.
Figure 1. Start creating your account from AWS Free Tier.
In the screenshot — ① Click Create a free account.
Expected result — AWS opens the Sign up for AWS screen.
NOTE If you already have an AWS account, do not create a new one. Use the option to sign in to your existing account instead. |
3.2 Enter your email and account name
Purpose — Set up the basic identity of your AWS account.
What to do — Enter the email address you will use as the Root user email address.
Enter an AWS account name that is easy to recognise.
Click Verify email address.
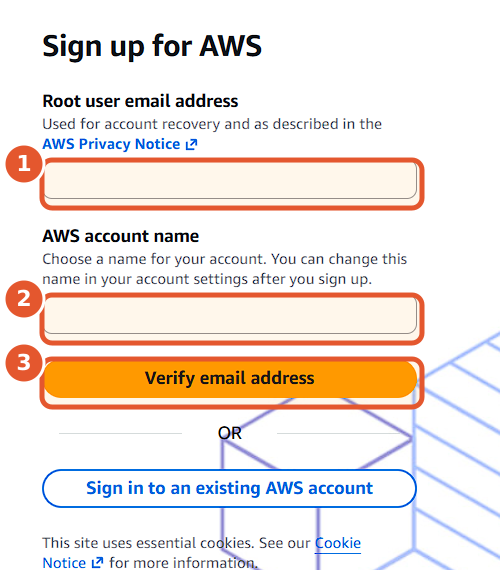
Figure 2. Enter the Root user email address and AWS account name.
In the screenshot — ① Enter the Root user email address. ② Enter the AWS account name. ③ Click Verify email address.
Expected result — AWS sends a verification code to that email and opens the Confirm you are you screen.
NOTE The Root user has the highest level of access in AWS. Use an email address you will control for the long term, and do not share access to it. |
3.3 Verify your email
Purpose — Prove that you have access to the email address you registered.
What to do — Open the inbox of the email you entered and find the verification code.
Enter the code in the Verification code field.
Click Verify.
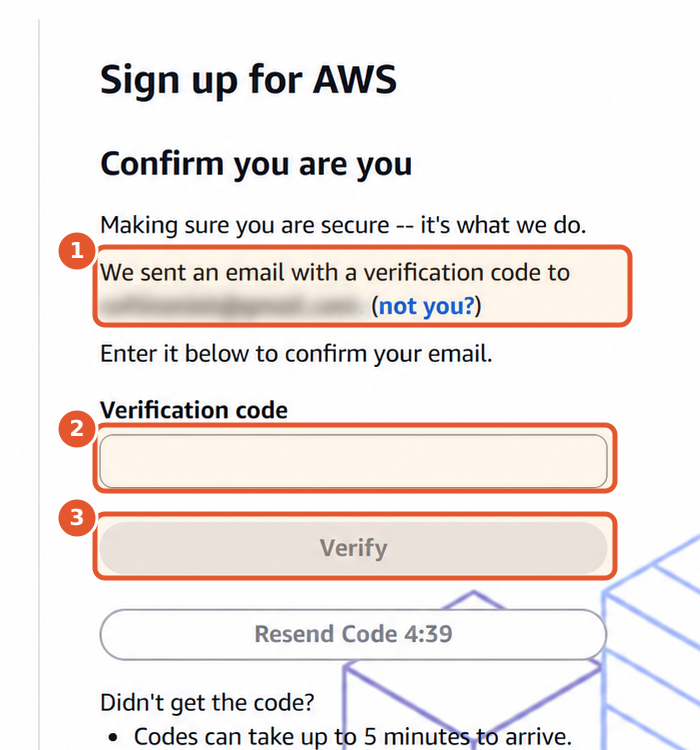
Figure 3. Enter the Verification code to confirm your email.
In the screenshot — ① Check that the code went to the right email. ② Enter the Verification code. ③ Click Verify.
Expected result — AWS confirms that your email is verified and moves on to creating a password.
NOTE The code can take up to 5 minutes to arrive. If it does not, check your spam folder, then use Resend Code. Never share this code with anyone. |
3.4 Create the Root user password
Purpose — Protect your AWS account with its own password.
What to do — Enter a password in Root user password.
Enter the same password again in Confirm root user password.
Click Continue step 1 of 5.
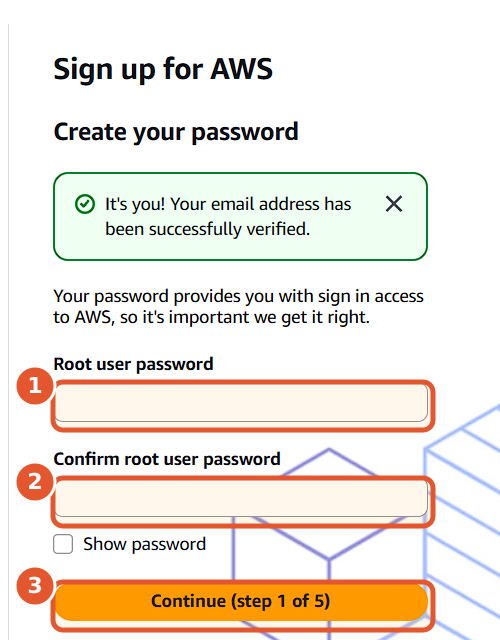
Figure 4. Create the Root user password.
In the screenshot — ① Enter the Root user password. ② Enter it again to confirm. ③ Click Continue step 1 of 5.
Expected result — AWS moves on to the screen where you choose an account type or plan.
NOTE Do not reuse your email or Neax.ai password. Do not take or send screenshots that show your password. |
3.5 Choose an account plan
Purpose — Pick the right plan before you continue.
What to do — Read the benefits and limits of each plan on screen.
If you want to start with the free plan, as in the source material, click Choose free plan.
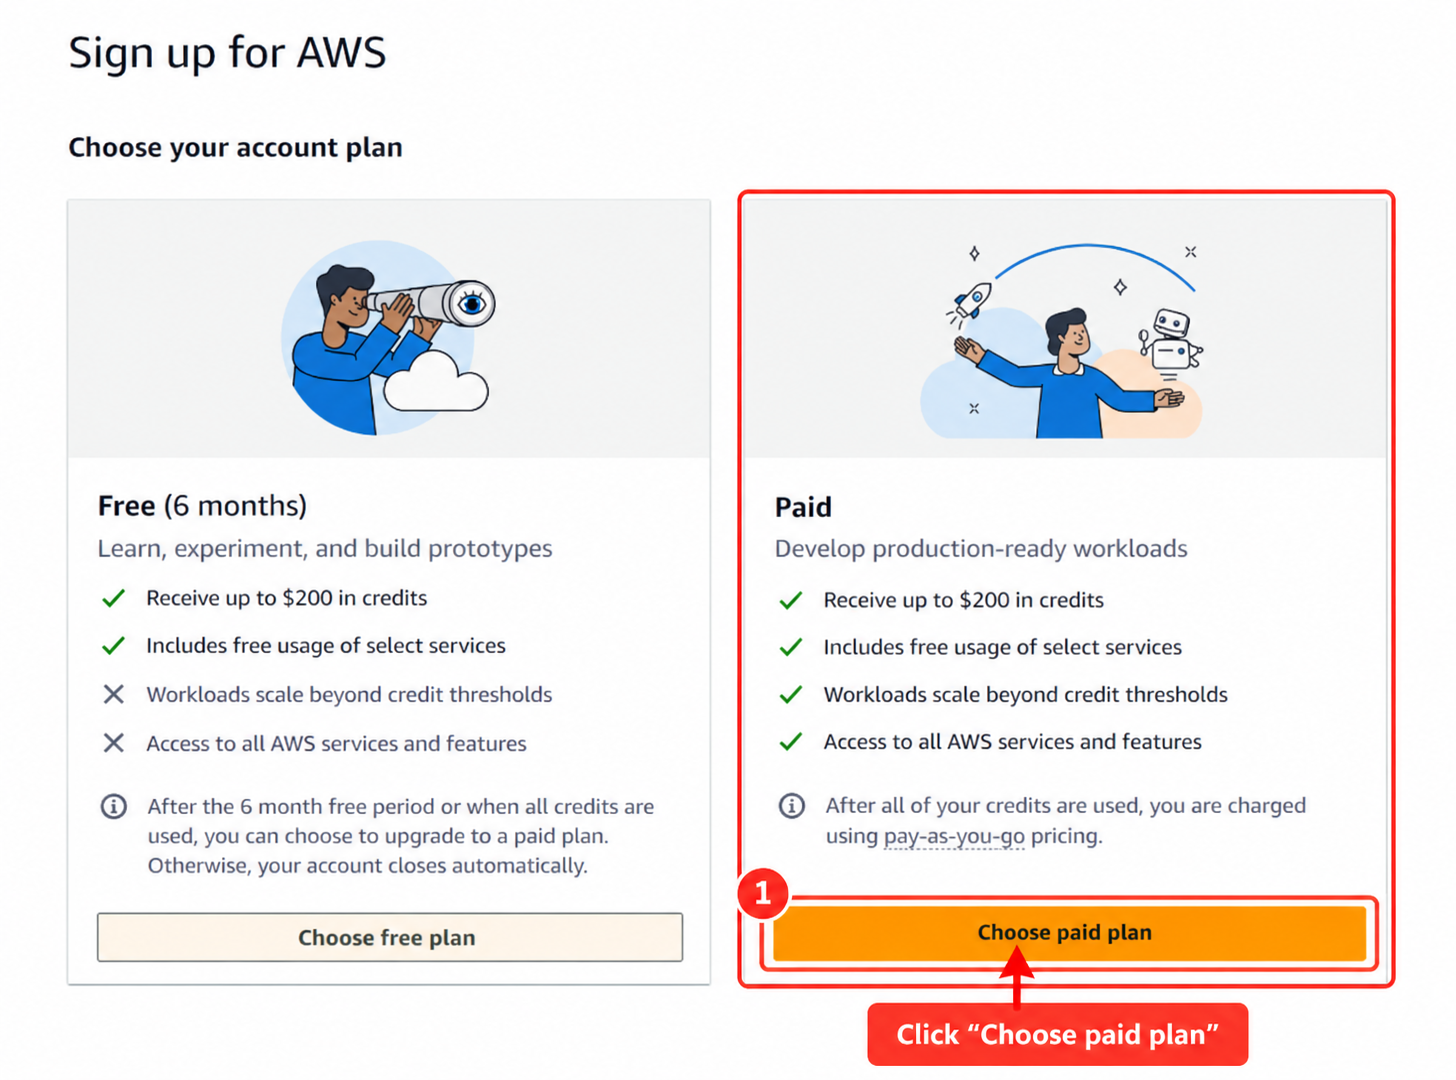
Figure 5. Choosing an AWS account plan.
In the screenshot — ① Click Choose paid plan.
Expected result — AWS moves on to the Contact Information step.
NOTE Do not choose Paid unless you understand how billing works. In the source screenshot, the Paid plan may charge pay-as-you-go rates once your credits run out. |
3.6 Enter your contact information
Purpose — Provide the identity and address of the account owner.
What to do — Fill in each numbered group of fields shown in the screenshot.
Read the AWS Customer Agreement before you accept it.
Click Agree and Continue step 2 of 5.
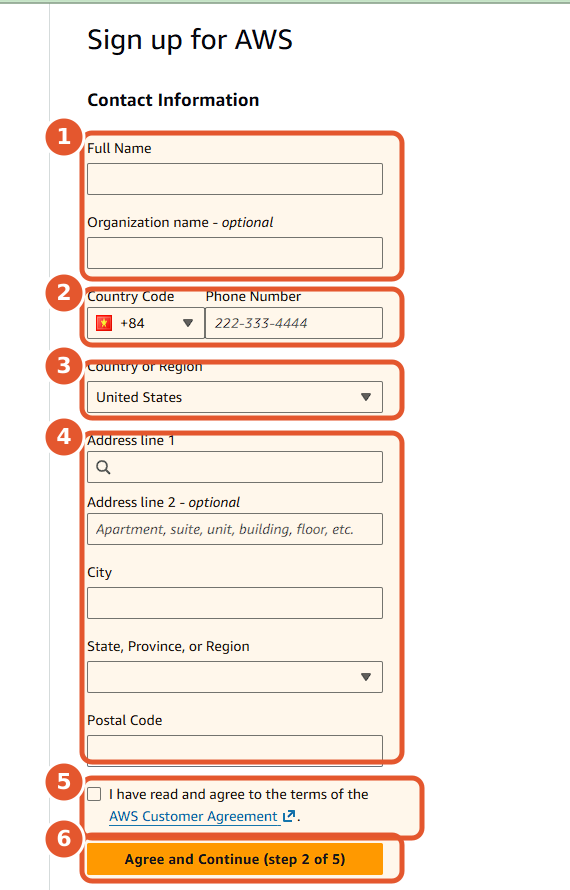
Figure 6. Fill in Contact Information and accept the AWS Customer Agreement.
In the screenshot — ① Enter your Full Name and Organization name if any. ② Choose the Country Code and enter your Phone Number. ③ Select the correct Country or Region. ④ Enter Address line 1, Address line 2 if needed, City, State, Province or Region, and Postal Code. ⑤ Read and tick the box to accept the AWS Customer Agreement. ⑥ Click Agree and Continue step 2 of 5.
Expected result — AWS moves on to the Billing Information step.
NOTE The source screenshot shows United States under Country or Region. Users in Vietnam should select their own country and enter real details that match their billing records. |
3.7 Enter your billing information
Purpose — Verify the account and set up a payment method for AWS.
What to do — Fill in your card details and billing address in the numbered areas.
Click Continue step 3 of 5.
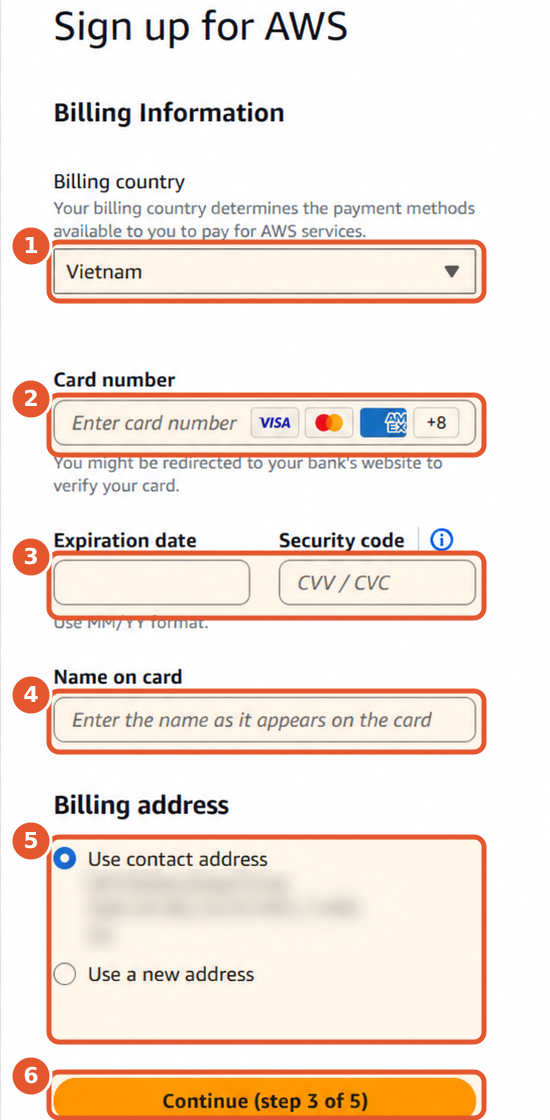
Figure 7. Enter Billing Information for your AWS account.
In the screenshot — ① Select the Billing country. ② Enter the Card number. ③ Enter the Expiration date and Security code. ④ Enter the Name on card. ⑤ Choose Use contact address or Use a new address, and check the address. ⑥ Click Continue step 3 of 5.
Expected result — AWS accepts your billing details and moves on to the next sign-up step.
NOTE AWS may redirect you to your bank's website to verify the card. The source screens also mention a temporary hold of USD 1 (or the equivalent) for 3 to 5 days. Never enter card details on Neax.ai. |
3.8 Choose a support plan
Purpose — Choose a support level for your AWS account and finish signing up.
What to do — If you do not need paid support, choose Basic support Free.
Click Complete sign up step 5 of 5.
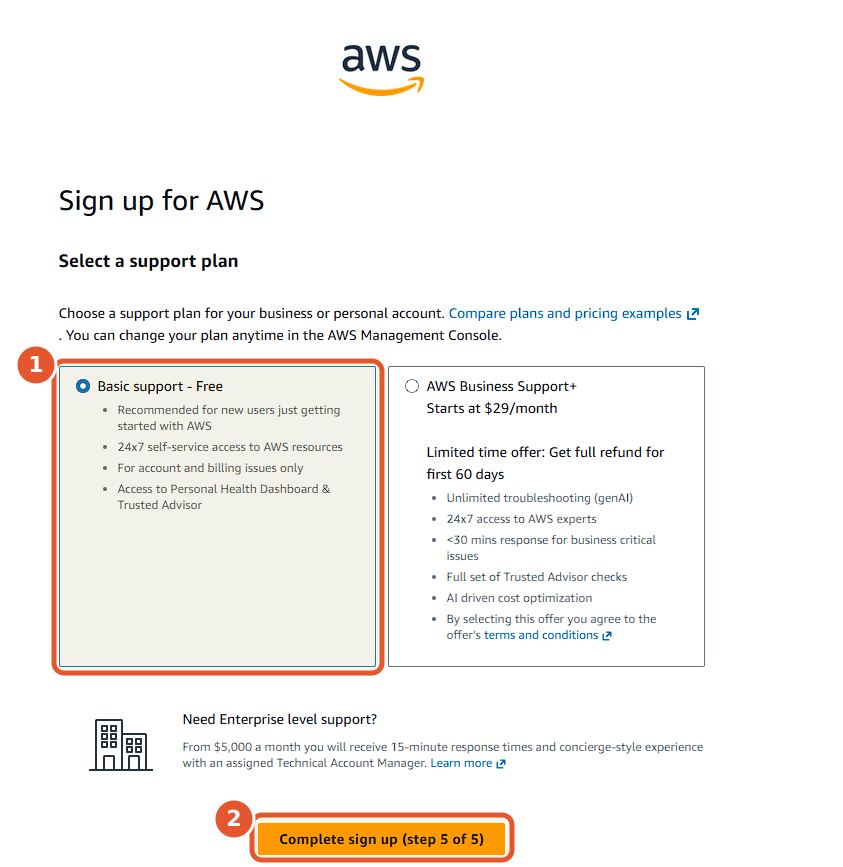
Figure 8. Choose a support plan and complete your AWS sign-up.
In the screenshot — ① Choose Basic support Free. ② Click Complete sign up step 5 of 5.
Expected result — AWS completes the sign-up and lets you into the AWS Console once the account is activated.
NOTE AWS Business Support Plus in the screenshot is a paid plan. Only choose it once you have confirmed you need it and understand the cost. |
3.9 Check that you can access the AWS Console
Purpose — Confirm that your AWS account has been created and that you can sign in.
What to do — Sign in to AWS with the Root user email and the password you just created, if asked.
Check the screen you land on after signing in.
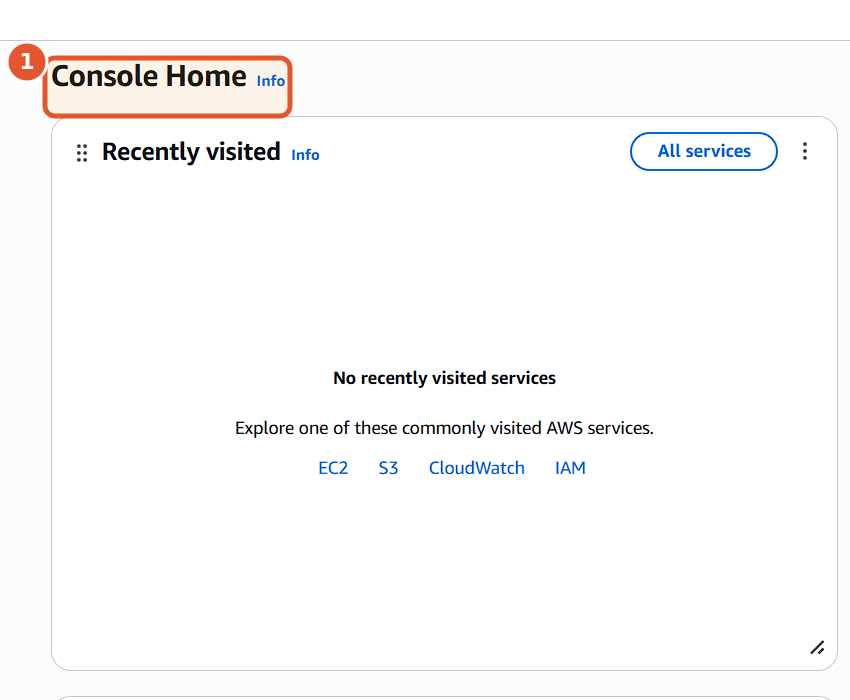
Figure 9. Console Home confirms that you can access the AWS Console.
In the screenshot — ① You can see the Console Home heading.
Expected result — You have finished creating your AWS account and can access the AWS Console.
NOTE Seeing Console Home only confirms that your AWS account works. It does not mean AWS is connected to Neax.ai yet. |
Step 2: Configure AWS for Neax.ai
STATUS [TO BE CONFIRMED] The source material does not yet include the steps or screenshots for configuring AWS specifically for Neax.ai. |
Do not create services, IAM users, roles, policies or access keys on your own until you know exactly what Neax.ai needs. A wrong configuration can grant overly broad permissions or run up unexpected costs.
Details you need from Neax.ai
Item | What needs to be confirmed | Status |
|---|---|---|
AWS services | Which services to use and what for. | [TO BE CONFIRMED] |
Region | The AWS Region to select when creating or finding resources. | [TO BE CONFIRMED] |
Access | Which IAM role, user or policy is required, and the minimum scope of permissions. | [TO BE CONFIRMED] |
Resources | Bucket name, endpoint, model, database or any other resource, if applicable. | [TO BE CONFIRMED] |
Connection method | Role ARN, access key, authorisation link or another method. | [TO BE CONFIRMED] |
Security and cost | MFA requirements, budget limits, cost alerts and key rotation rules. | [TO BE CONFIRMED] |
Configuration steps
Purpose — Create exactly the resources and permissions Neax.ai requires.
What to do — [TO BE CONFIRMED] Add instructions and AWS Console screenshots once the six items above have been confirmed.
Expected result — [TO BE CONFIRMED] Define the status or output details that Neax.ai uses to connect.
WARNING Never give Neax.ai your Root user password, MFA codes or card details. Only provide the connection details that have been confirmed. |
Step 3: Connect AWS to Neax.ai
STATUS [TO BE CONFIRMED] The source material does not yet include the URL, menu, fields, buttons or screenshots for the connection flow on Neax.ai. |
This section must be written from the actual Neax.ai interface. Screen names and credential types cannot be guessed, because each connection method carries different risks and permissions.
Details still needed from Neax.ai
The exact URL of the Neax.ai page used to connect AWS.
The menu path from the home page to the configuration screen.
The name and data format of each field to fill in.
The buttons to click, in the right order.
Any permission or authorisation step that appears on AWS.
The actual success and error messages.
Screenshots of every screen, with sensitive data masked.
Outline to be completed after confirmation
Purpose — Connect your AWS account or resources to your Neax.ai account.
What to do — [TO BE CONFIRMED] Add each click, field and permission based on the actual Neax.ai interface.
Screenshots — [TO BE CONFIRMED] The source material has no Neax.ai screenshots yet.
Expected result — [TO BE CONFIRMED] Define the message or status that shows a successful connection on Neax.ai.
IMPORTANT Never paste your Root user password, email verification code, card details or MFA code into Neax.ai. |
Verify your setup
Verify your AWS account
Your AWS account setup is complete when all of the following are true:
☐ Your email has been verified.
☐ You have completed every screen from step 1 of 5 to step 5 of 5.
☐ You can sign in to the AWS Console.
☐ You can see the Console Home heading.
Verify the Neax.ai connection
STATUS [TO BE CONFIRMED] No checks can be given yet, because the source material has no Neax.ai connection screens or messages. |
Once the Neax.ai flow is available, this section should list at least three signs: the connection status, the time of the most recent check, and one test action that does not change any data.
Troubleshooting: common issues
Issue | Possible cause | What to do |
|---|---|---|
No verification email arrives | The email may be delayed or in your spam folder. | Wait up to 5 minutes, check Spam or Junk, then click Resend Code. |
The Verify button does not work | The Verification code field is not filled in completely. | Enter the exact code from the email, then check the Verify button again. |
Cannot continue past Contact Information | A required field is missing or the AWS Customer Agreement has not been accepted. | Check each area from ① to ⑤, then click Agree and Continue. |
The card needs extra verification | Your bank may require its own verification step. | Complete the step on your bank's website or app, then return to AWS. |
You see a USD 1 hold | AWS may use a temporary hold to verify the account. | According to the source screens, the hold may last 3 to 5 days. If it stays longer, contact AWS Support or your bank. |
Worried about charges | You may have chosen a paid plan or used services beyond the free limits. | Stop, check the plan you selected and the terms shown on screen. Do not continue until you understand the costs. |
Cannot connect to Neax.ai | Configuration instructions or exact connection details are missing. | [TO BE CONFIRMED] Do not recreate keys or widen permissions until Neax.ai provides official requirements. |
Final checklist
Go through this checklist before you finish:
☐ Email, contact details and a valid payment card are ready.
☐ Your AWS email has been verified.
☐ You have created a separate Root user password and stored it safely.
☐ You have chosen the right account plan and support plan.
☐ Contact and billing information are complete.
☐ You can sign in to the AWS Console and see Console Home.
☐ You have not shared any password, MFA code, email code or card details.
☐ You have received the full AWS configuration requirements from Neax.ai. [TO BE CONFIRMED]
☐ You have connected to Neax.ai and confirmed a successful status. [TO BE CONFIRMED]
Safe stopping point
STOP HERE IF YOU DO NOT HAVE THE CONFIGURATION DETAILS YET If you have reached Console Home but do not have the details for Step 2 and Step 3, stop here. Your AWS account has been created, but the Neax.ai connection is not complete yet. |